Homemade gifts are an excellent way to show someone you care without spending a ton of money or time in malls. And what better time of year for a personalized gift than Christmas (Hanukah, Festivus, Kwanzaa, Yule, etc)?
Local craft-blogger Natalia “Tally” Heilke, organizer of semi-annual DIY crafting fair Iconocraft and co-ordinator for the annual craft-along Desert Bus for Hope fundraiser tells Monday how easy it can be to get crafty for Christmas.
“I like to make as many handmade gifts as possible every year,” says Heilke. “Instead of shopping and crossing people off the list, I think about what they would like, what would suit them and make them something special — just for them. It’s a unique thing that no one else can give them. People really like the idea that you put some real thought, time and love into it, and sometimes time is harder to come by than money. Plus it’s really satisfying personally.”
Heilke updates her blog every Friday with a DIY tutorial for a new craft. She also has templates and basic how-to descriptions on her blog to help even the most timid beginner create something special and unique (I Could Make That, nheilke.com/blog).
Craft 1:
Pinback Button magnets and jewelry
You can make some amazing things with those cute little pinback buttons that are so cheap and plentiful these days. If your bag is covered in them, save a few from the potential of getting trampled on the street (after they fall off your bag) by making them into fridge magnets or a pair of earrings.
To turn them into magnets, you’ll need:
buttons
magnets (small round ones)
superglue
pliers
1. Use the pliers to pull out the actual pin backing. If you have a larger pin, that has a different kind of backing on it, use wire cutters to remove most of the backing, and a hammer to flatten down the little bits that are left.
2. Use the superglue to attach the magnet to the back of the pin
3. Apply to your fridge, filing cabinet or pet robot.
To make them into earrings, a necklace or a bracelet, you’ll need:
buttons – two for earrings, one for a pendant. For this project the buttons have to be the small 1-inch ones that have the pop-out pin backs
needle-nosed pliers
round-nosed pliers
wire cutters
jewelry findings (earring hooks, chain and clasps for a necklace or bracelet, jump rings to add length… whatever you want)
1. Use your needle-nosed pliers to bend the pointy ended pin bit of the backing outward and up, so it makes a straight line pointing out from the edge of the button.
2. Use your wire cutters to trip off the sharp tip of this piece of metal. Remove about 1/8 inch.
3. Use your round nosed pliers to bend the metal into a small circle. Spin the backing around so that this loop is situated wherever you’d like the top of the earring or pendant to be.
4. Attach whatever jewelry findings you wish to make the button into an earring, a pendant, or a bracelet charm.
Craft 2:
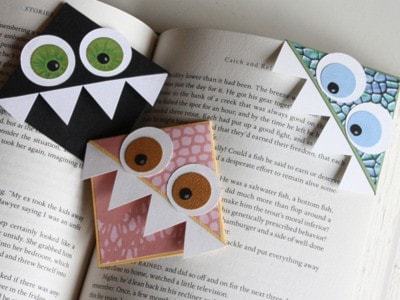
“This is one of my most popular posts,” says Heilke. “If you’re giving a book, a great way to personalize the gift is to include a custom bookmark.”
What you’ll need:
pretty paper of cardstock weight OR a combination of plain cardstock and pretty, decorated lighter weight paper
envelopes
scissors
ruler
mechanical pencil
glue stick
[optional] other decorating tools, such as crayons, markers, stamps, stickers, ink pads, embossing powder, etc.
page corner monster bookmark template (or you can make your own using the instructions below)
1. Cut the corner off an envelope
2. decorate one side as you wish
or
1. Use Heilke's template here: nheilke.com/blog/wp-content/uploads/2011/05/page-corner-bookmark-monsters.pdf
2. Trace your template onto your piece of cardstock and cut the shape out.
3. Using your ruler and the tip of your mechanical pencil with no lead showing, score a line (make an indent) along the edges of the square that connect to the two triangles.
4. Cut a square of pretty paper slightly smaller than the one you used for your template and glue it onto the square portion of your shape. I generally do this if the paper I’m using is quite plain.
5. Fold one triangle inwards, so it covers the upper half of the square.
6. Apply glue to the underside (the side still facing up) of the second triangle, and fold it over onto the first triangle.
7. As in step 4, if you’ve used plain cardstock and want to glue fancy paper on top of it, cut out a triangle of the fancy paper that’s slightly smaller than the folded-over triangles of the bookmark. Glue the smaller triangle on top of the larger, folded-over ones.
8. Add any decorations or illustrations you wish. Use by slipping over the corner of the page you wish to mark, like a pocket.
Craft 3:
“This is great for the person with a sweet tooth on your list. Or you can fill the bottles with savoury things just as easily,” says Heilke. She also recommends this craft for the man on your list . “Men are often really hard to craft for, so you can fill the bottles with all their favourite goodies and make your own label.”
1. Empty a 6-pack of glass soda bottles, then rinse and dry them out. Make sure that you keep the cardboard carrier for the 6-pack, and also make very sure that your bottles are entirely dry inside. If they are not, bad things will happen
2. Make a fun new label for each bottle. The Coke bottles were trickier to label than, say, Jones Soda bottles would be, due to the inward-slanting shape of the labeled part of the bottle.
3. Glue the labels on.
4. Make a new label for the 6-pack, as well.
5. Fill the bottles with good things.
6. Put some kind of lid on the top of each bottle. Depending on what soda bottles you use, they may have screw-on caps that you can reuse. My Coke bottles had those good-old, not-really-reusable bottle caps, so I had to rig up something new.
7. To Make a Felt Cork:Cut a rectangle of felt and fold it in half. (Cut it a bit bigger than you think you’ll need it to be – it’s easier to trim it down to make it fit the bottle’s mouth than to recut a whole new piece.)
8. Roll up the folded rectangle. This is also the step where you check to see that your “cork” will fit properly – not too big or too small – and make any necessary adjustments.
9. Trim any uneven edges.
10. Using a matching colour of thread, sew up the edge of the “cork” so it stays in place.
Craft 4:
Bleaching designs on to T-shirts
This craft is great to use up some of that plain old clothing or tote bags you may already have by dressing it up with some new custom patterns for that special someone. Heilke recommends using contact paper for this craft because it’s easy to use and won’t let the bleach bleed through the garment.
What you’ll need:
bleach
fabric (be it a T-shirt or other garment)
spray bottle
water
a bathtub or other safe place to mess around with bleach
thick cardboard (a flattened cereal or beer box works well)
old wire hangers or a clothes drying rack and some clothespins would be useful, too
For making your design:
the design you want to use (whether that’s a computer printout, an original drawing, etc.)
pen or pencil
AND
clear contact paper
1. Prep yourself and your space. For starters, put on some old wrecky clothes. Or, if no one else is around, this is the sort of project you’d be well advised to just do in the nude. Unless you have a special concrete-floored studio area or a useable garage, you’ll want to do this project in the bathtub, or perhaps a large laundry room or kitchen sink. If using the bathtub, fold your shower curtain up over the bar and out of the way. Move any nearby towels or other bleachable items well out of the way. Gather up a few old rags (that can get bleach on them) to have on hand.
“From my own experiences with this, I’ve found that red shirts are very difficult to bleach,” says Heilke. “My attempts had almost no effect on the red t-shirt scraps I used.”
2. Print or sketch the design you wish to use. If you’re drawing your own design, you can draw it straight onto the contact paper or other template material, or you can draw it onto some paper, then cut it out and trace it onto your template material.
3. Cut out your templates.
4. Apply the template to the fabric.this is as simple as peeling the backing off and sticking the shape whereever you want it.
5. Pour some bleach into a small spray bottle, then add about the same amount of water. Half bleach, half water. Swoosh it around a bit in the bottle and you’re ready to go.
6. Take the bleach mixture, the templated fabric or garment, and your own appropriately dressed or undressed self to the bathtub or other safe bleaching area. If you’re doing something with only one layer of fabric (a test piece, an unsewn piece of cloth, etc.), lay an old rag down in the tub or sink or whatever space you’re using, then put the fabric on top of it. The rag will soak up the bleach that goes through the fabric. Otherwise it will leak through and be redistributed along the slick surface of the tub, bleaching the areas you’ve blocked off from the back side.
7. If you’re doing a garment or bag or other double-layered item, put a thick piece of cardboard (like a flattened cereal box) between layers, so the bleach doesn’t soak through, say, the front of the shirt and onto the back.
8. Lay the fabric down and get it as flat and smooth as possible. Then spray a light mist of the bleach mixture onto the fabric over and around your template. DO NOT spray a lot. It may look for a minute like not much is happening. WAIT.
9. Once you’ve let it sit for a few minutes, you can spray on more bleach if you wish. When you’re done with the bleaching, remove the templates. Then carefully hang the fabric to dry.
10. Thoroughly rinse out the fabric in cold water. I did this several times with each piece, to make sure all the bleach was out. The first time you put any garment you’ve bleached in the washing machine, put it in on its own, or in a load of old towels or all whites, just in case.
Craft 5:
“I like to give gifts that have a specific purpose so people can do something with it right away, like hang it on the tree,” says Heilke, who taught beginner crafters to make these ornaments at Iconocraft, a twice-annual DIY crafting fair in Victoria. “I can guarantee that people who have never felted before can make this very easily. It seems really complicated and far out there, but when you sit down and do it it’s really straight forward. It’s also a really inexpensive craft.”
What you’ll need:
wool rovings — this is the term for clean, combed and un-spun, un-processed wool. Rovings can be found at wool and yarn shops, or online. You’ll need one main colour for your bird (or two or three colours if you wish) and a teensy bit of black or some other colour for the eyes.
felt — the pre-made, processed cloth you get in sheets or on bolts, like fabric. You’ll only need a tiny piece (2 square inches will be more than enough), in a colour suitable for your bird’s beak
thread — I recommend using upholstery thread, as it’s thicker and stronger than normal thread.
Heilke has a Needle Felting Basics tutorial on her blog here
Tools:
thick foam — a squarish piece about 2 inches thick and roughly 5 or 6 inches wide will do nicely. Larger is fine.
felting needles
small sewing needle
1. Start with your main colour of wool. You’ll need to tear off a smaller piece to begin with.
2. Ball one end of the roving up. Continue rolling the rest of the roving up into a ball, keeping it as tight as possible. Roll the entire piece of wool up this way, and place it on top of the foam, pinching it together between thumb and forefinger.
3. Hold the wool in one hand, on top of your foam block. Take your felting needle and stab the wool with it, straight up and down. Always keep your eyes on the needle.Roll the ball around, continuing to stab, so that you are stabbing all sides of it equally, keeping its round shape. The ball will compress and grow smaller as you stab, and as the fibres lock together. Continue stabbing and stabbing, and the wool will continue to compress and take shape.
4. To make the ball larger, take another piece of wool roving and wrap the end around the ball you’ve made. Stab the end into place a bit, then roll the rest of the roving around the existing ball, and stab it smooth and into place, building on the surface of the ball you’ve created.
5. When you are satisfied with your wool ball, set it aside and follow the same steps to make a slightly smaller ball of the same colour (or a different colour, if you want a multicoloured bird).
6. Set aside the smaller ball and take up the larger one again. take a small, thin wisp of roving – about 4 inches long. Fold it in half.
7. Lay this wisp down across the larger ball, and stab the folded end into the ball so it stays in place. When you pick up the wool ball and flip it, the loose wispy ends of the roving form the bird’s tail.
8. Take your little piece of felt and fold it in half. Cut a triangle along the fold – unfolded it’s a diamond.
9. Lay this felt diamond down on the smaller felt ball, with its center right in the middle and front of the bird’s head. Use your needle to stab in a straight horizontal line along the center of the diamond.
10. If you want your bird to have eyes, take a very small bit of black wool roving, crumple it up between your fingers, and stab it into place on one side of the beak. Repeat with another bit of black roving on the other side of the beak for the other eye.
11. Thread a needle with upholstery thread. Do not knot it, and do not double up the thread. Push the needle through the larger ball that forms the bird’s body, from the bottom center up through the top of the ball. Leave one end of the thread dangling from the bottom of the ball. Next, thread the needle through the bird’s head, from the bottom centre up and out the top centre.
12. Thread the needle back through the same place in the bird’s head, then the bird’s body. Be sure to leave a loop of thread coming out of the bird’s head.
13. Knot the two ends of the thread together underneath the bird’s body, then push the head and body together. You should have a wee needle felted bird with a loop of thread coming out its head for hanging it up.
Christmas Eve present wrapping
1. Use an empty toilet paper tube. This is perfect for small delicate or awkwardly shaped objects, and saves you buying an expensive box (or making one). It’s great if you’re pressed for time. Just put the gift in the tube, then situate the toilet paper roll in the middle of a square of tissue paper and pull the paper up around it, tying it in place with some ribbon. This is also a very lightweight option if you’re mailing things.
2. Go the classic minimalist route by using newspaper or some plain brown butcher paper. You can stay simple by tying it up with string, or go fancier with ribbons and colourful tags.
3. Maps! Old atlases are good for a whole bunch of things, and wrapping paper is definitely one of them. They’re colourful, unique and the paper is sturdy and doesn’t tear easily, so they can be reused.
4. You could also try colourful magazine pages or old sheet music.
5. Use stamps to dress up a plain white paper box or plain white tissue paper. If all you have around the house is computer paper, this is a great way to make it more interesting. If you don’t have stamps, make some out of a potato and use washable markers instead of an ink pad. Or doodle on the paper. If you’re not a doodler, trace around a bunch of jar lids with different coloured markers or crayons, overlapping circles or other shapes.
6. Make a simple paper box to put your small gifts inside. The internet is full of wonderful box tutorials and templates. Here’s a link to a whole host of them. And here’s the template and tutorial I based mine off. Use pretty paper or decorate the box itself and you’ve eliminated the need for any kind of wrapping paper whatsoever.
7. Use last year’s Christmas cards to make gift tags this year. Just cover up the back with last year’s message with solid paper and write a new message.